Showing posts with label Misc. Projects. Show all posts

Tuesday, January 15, 2013

MICRO WAVE DISH COVER


Make this simple but useful micro wave dish cover from large paint strainer and a few small buttons. I have some of these I made 2 years ago and they are still being used . Reduces micro wave cleaning!
Materials
1 large paint strainer from hardware store.
8 to 10 buttons
Jewelry glue or thread
Tools
7, 9, 12 inch diameter dish covers.
scissors and pencil
Steps
1. Lay the 3 dish covers on the paint strainer and trace with pencil(see 2nd photo below).
2. Repeat step 1 on the other side of paint strainer.
3. Cut out the 6 circles from the strainer.
4. Glue or stitch buttons evenly around the outside of the circles(see 1st photo below).
5. Place correct size circle over the top of dish in the micro wave and prevent splatter of food.


Sunday, October 4, 2009

INDIAN CORN CANDLE HOLDER

Here is a simple, but attractive center piece/candle made with an ear of Indian Corn.
Materials:
1 ear of dried Indian Corn
1 6” plywood disc from Walmart Craft Department
1 top section of a water or soda bottle 1 autumn colored candle
1 bouquet of plastic autumn leaves Modeling dough black and orange
Wood stain and finish
2 part epoxy and hot glue
Tools:
Saw, sand paper, hot glue gun, and brush
Steps:
1. Sand, stain and finish 6” wood disc for base (apply 2 or 3 coats of finish).
2. Cut the bottom and top of the ear of corn off so that you have 2 square flat ends.
3. Cut the top of a water or soda bottle off just below the flange that is below the threaded part of the bottle, and sand until bottom of flange is smooth and flat.
4. Using 2 part epoxy, attach the larger end of the corn to the center of the 6” wood disc.
5. Attach the flange section of bottle to the small end of the corn with 2 part epoxy, making sure to center and keep perpendicular to the wood base (try placing the candle into bottle piece to keep perpendicular).
6. Form a flat piece of orange modeling dough about 1/8” thick and wide enough to cover the treads on bottle piece. Apply the dough to the threaded piece and smooth in place as in photo above.
7. Form a piece of black dough to apply to the top of the corn and over the flange of the bottle piece as in photo above.
8. Allow the dough to set a day to harden and cover the whole center piece with finish if desired.
9. Remove individual leaves from bouquet and hot glue to base around the bottom of corn as in photo above.
10. Insert candle into open end of bottle piece and display for autumn accent.

HALLOWEEN DECORATION


This is a simple way to make some Halloween Creatures.
Materials:
1 empty gallon water jug
1 black permanent marker
1 or 2 battery tea candles
½ yard of black material or 1 over the head mask
Tools:
Scissors or knife and hot glue gun
Steps:
Cut the top off 1 gallon water jug, and cut small opening in side of jug on handle side as in first photo above.
For the middle photo design draw face on sides of jug opposite the handle as in second photo above.
Cover the opposite sides from the face with the black material, leaving a flap where the hole was cut in the jug for the tea candles to be inserted.
Another option is to buy a over the head mask and place it over the jug as in the third photo above.
Turn on the tea candles and insert in the hole at back of jug and display at night.


Thursday, August 6, 2009

COUNTING BEADS

These are called counting beads because it is used to help people keep track of how many glasses of water they consume in a day. It can be used for anything that needs to be counted. The one with the larger beads is for my husbands’ golf bag where he uses it to keep track of the # of strokes per hole. If you make one of these for a woman I would use bright colored beads.
Materials: 16” (about) cording, 8 beads. For the golf set I used 19” cording and 9x6 mm pony beads.
Directions: Fold cord in half tie a loop knot at top, thread beads by starting at the outside edges, thread left side through to the right then right through to the left, and continue this for all 8 beads then tie a knot at bottom. * note, the knot at the end should be about ½” from the bottom bead. I use one dark bead at the bottom of the small set to start.
Now you will be able to slide the beads one at a time till you reach the top.

Monday, July 13, 2009

ROPE WRAPPED ICE BUCKET

This attractive ice bucket is made with ice cream container, rope, and cardboard.
Materials:
1 roll of 1/4" Sisal Rope(Walmart)
1 half gallon plastic ice cream container
2 cardboard circle assemblies
1 brass cabinet knob with screw
Wood glue, white glue, walnut wood stain, and amber shellac
Tools:
Scissors, screw driver, staining cloth, and finish brush
Steps:
1. Cut several non-corrugated cardboard disc, like cereal box, at the same diameter as the inside rim of plastic container(5 7/8" for our container), cut enough to glue to 3/16" thickness, glue(white glue) together and clamp by placing weight on top.
2. Cut several cardboard disc with a diameter 1/2" large than the outside rim of container(6 1/2" for this container), cut enough to glue to 1/4" thickness, glue together and clamp by placing weight on top.
3. Sand both disc assemblies until smooth and even, glue the smaller disc to the center of the larger disc and clamp with weight(see 2nd photo above), this makes your top.
4. Sand the top as needed, stain with walnut stain. When dry apply several coats of amber shellac. When dry drill hole in center of top and attach cabinet knob as in 1st photo above.
5. Apply rope to the out side of container using wood glue on each wrap of the rope as in 1st photo below.
6. Continue to wrap and glue rope until the container is totally cover as in 2nd photo below. Make sure to apply glue so that it sticks rope to container and rope to itself, leave contain sitting as in 2nd photo until glue is dry(2 to 3 hours).
7. Apply several coats of amber shellac to the rope on out side of container.
8. Place top on container and start using your new ice bucket.
Note: When tested ice lasted 3 to 4 hours.


Saturday, July 11, 2009

PATRIOTIC CLOCK

This Patriotic Clock is made from the top half of a Rubbermaid Twin Turntable(bottom was used in another project = Craft Tools Caddy Turntable). Soda bottle caps make the number location bases. You could use a plastic tray or some other round object to make this clock, we used turntable top to avoid waste.
Materials:
1 bottom section of Rubbermaid turntable
12 soda bottle caps(red, white, & blue)
1 cheese whiz plastic cover
1 set of clock works with hands and hanging clip(craft store)
1 flag picture printed on address label
1 set of peel and stick numbers
Super Glue
Tools:
Drill and bits
Steps:
1. Drill 3/8" hole in center of clock face and cheese whiz cover.
2. Remove hands and nut from clock works, insert shaft through clock face and cheese whiz cover, screw holding nut back onto clock shaft until tight.
3. Super glue bottle caps around clock face at 30 degrees in the red, white & blue order.
4. Peel and stick numbers onto bottle cap in proper order.
5. Print a flag picture(or what you like) onto address label, peel label and stick over the Rubbermaid label.
6. Attach the clock hands to the shaft and place a battery into back of clock, hang clock.

Thursday, July 9, 2009

DECORATIVE ROPE DISH WITH ORNAMENTS

You can make this rope dish and ornaments easily and cheaply.
Materials:
1 roll of sisal rope($2.97 at Walmart)
5' pieces of Jute Twine
4' piece of cotton twine
2 straw bale strings
7" disc of cardboard
Small piece of aluminium foil and piece of Cling Wrap
Assortment of styrofoam balls($5.00)
Wood glue, white glue, food coloring, and amber shellac
Tools:
Scissors, 8" stainless steel bowl, and stapler
Steps:
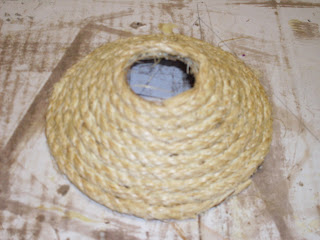
1. Cover a 8" stainless steel bowl with Cling Wrap and set open side down. Wrap one row of 1/4" sisal rope around large end of bowl, apply wood glue on upper edge of rope, wrap another row of rope around bowl. Continue to glue rows of rope around bowl until totally covered(see 1st photo below).
2. Let assembly set 2 to 3 minutes, separate the bowl and cling wrap, remove cling wrap from assembly, pat inside of assembly with dam cloth to remove excess glue(hold one hand behind the area as you remove glue, assembly is still wet).
3. Set assemble(the top part of dish) aside to dry with open side down.
4. The base of the dish is made the same way if you have a smaller dish for form or you can make a cone from cardboard as in the 2nd photo below, the attached drawing gives measurements of cone. Construct one as shown and work it until evenly shaped.
5. Using smaller dish or cone, construct base of dish as in 3rd photo below. place base open side down to dry(cardboard can be removed or left in place).
6. Assemble the top and base, as in 4th photo below, with a layer of wood glue(make sure to center the base onto the top of dish. When dry apply 2 coats of the amber shellac.
7. At this point the dish is complete and can be filled with fake fruit. I made some ornaments to put in the bowl.
8. In the 2nd photo above the ball on the far left and far right are made by gluing(white glue) straw bale twine to styrofoam balls with a section wrapped around and dying with food coloring.
9. The 2nd ball from the left is a styrofoam ball wrapped with aluminium foil and finished with amber shellac.
10. The small ball 3rd from left is styrofoam wrapped with cotton twine and circled with knotted section of twine.
11. The large ball in the center is wrapped with the sisal rope and circled with a single stripe of the sisal rope.
12. The next small ball is a styrofoam ball finished with amber shellac.
13. The large ball 2nd from the right is wrapped with Jute Twine and circled with a knotted piece of same.
14. These are some options for ornaments for your rope dish, so use these or suit your taste and enjoy your new dish.


Friday, June 12, 2009

WINE GLASS CHARM HOLDER

The materials for this project are a hair scrunchie and four to six wine glass charms, also jump rings.
The scrunchie serves two purposes 1. it holds the wine glass charm rings, 2. it is also a drip guard for the wine bottle.
You will need to sew jump rings evenly spaced around a store bought scrunchie. Attach the wine glass charms to the rings and place over the neck of a wine bottle.
This pink scrunchie has an open lace design which allows for the rings to be attached at the openings no jump rings needed.
The typical dollar store will usually have both the scrunchie and the wine charms. So for two dollars you can make a set. The multi colored scrunchie is a hand crocheted design, which you can find in our crocheted projects.

Monday, June 8, 2009

INDEPENDENCE DAY PINS

The 4th of July is close and these simple pins are also cheap, but still cute.
Materials:
1 piece of red, white, & blue ribbon 6" long
1 heart shaped Deco brad
Tools:
Scissors
Steps:
1. Cut 6" piece of RWB ribbon.
2. Fold ribbon in a loop as in photo.
3. Punch a hole through ribbon where the 2 halves cross and insert brad.
4. To wear punch prongs on brad through shirt and fold down, could also wear on a hat.

Tuesday, June 2, 2009

HEART SHAPED JEWELERY RACK


The heart shaped jewlery rack is easy to make but an attactive wall hanging.
Materials:
1 wooden heart shape piece about 8" x7", or any size you might like, cut your self or get pre cut from craft store.
3ft. of decorative ribbon or to match heart size.
1 piece of cloth materials about 3" wider and longer than the heart.
Enough batting material to cover the heart twice(for 2 layers)
8 coffee mug hooks 1/2" size.
1 piece of backing felt to cover back of heart
1 picture frame hanging bracket with screws or nails to attach.
Tools:
Stapler, small hammer, screw driver, scissors, ice pick
Steps:
1. Cut out heart shape from 1/4" plywood or use precut heart.
2. Lay heart on bating material and cut 2 pieces.
3. Lay heart on the cloth and cut out rough shape leaving about an 1 1/2" of cloth all the way around the heart.
4. Lay the 2 pieces of bating on the heart, lay cloth over bating, flip the stack over with the wood up, bring the edges of the cloth onto the back of the heart and attach using a stapler as in first photo below, add strips of ribbon in a pattern, like the photo above, and staple the ends to the back of the heart as in the first photo below.
5. Using the ice pick, punch a pilot hole through the ribbon, cloth, bating and into the wood at each point where the ribbons cross(see photo above), insert a mug hook in pilot hole and tighten.
6. Cut out a piece of backing felt and glue it to the back of the heart assembly as in the second photo below.
7. Attach picture hanging bracket to the back of the heart as in second photo below.
8. Mount on the wall and hang your jewelery as in last photo below.


Tuesday, May 12, 2009

TEDDY BEER COZY


Teddy Beer Cozy
Materials:
1 beer bottle cozy
1 stuffed Teddy Bear
Both items were bought at Dollar Tree.

1. measure up about 2 ¼ “ cut the feet off
the bear remove the stuffing.
2. undo the stitches that make up the legs
sew them to make a tube .
3. remove the stitches across the top of
head of the bear.
4. Cut down the back of the bear for the zipper
opening of the cozy(see photo below). Remove half the stuffing
from the head.
5. Carefully insert the cozy into the bear opening
Stitch along the edges to match the top and back openings
Then stitch around the bottom attaching the feet evenly
Spaced at the front of the bear.

The bottom has no fur just the bottom of the cozy
This helps in standing.

SUCTION CUP NOTE HOLDER


This is a fun and practical project that is very low cost.
Two of these note holders have a weighted bases and
2 of them have suction cup bases.
Materials(see 2nd photo)
Stems = dowel, straws, and section of a plastic coat hanger
Bases = 2 bottle covers and 2 suction cups
Clips = small plastic clothespin and 3 small wooden clothespins
Ornaments = 2 flowers from craft shop, 1 football from craft shop, 1 crocheted butterfly
Hot glue and Mighty Putty
Steps for weighted base holders
Drill hole in bottle caps to suit stem
Insert stem into hole in cap and fill cap with Mighty Putty(or similar product)
Hot glue one side of clothespin to stem(with straw stems fill the end with glue, insert one half of clothespin).
Hot glue ornament to stem and clothespin.
Steps for suction cup base holder
Hot glue stem into end of suction cup
Hot glue one side of clothespin to stem
Hot glue ornament to stem and clothespin.
The added value of the suction cup base is that it can be stuck to any hard smooth surface.


Saturday, May 9, 2009

SOCK BANKS


This is a cute place for you to sock away your money.
You will need just a few items: A medium size tube sock, ribbon to hang it with, a recycled dessert bowl, or a canning lid set, and a short piece of heavy wire.(see 2nd photo)


For the bowl style you will:
1. drill or punch two small holes near the edge of the bowl thread a piece of ribbon through the holes tie in a knot with the knot on the inside of the bowl.
2. Cut an opening on the wall of the bowl for a coin slot.
3. Print out a picture of your choice (I used the butterfly) on cardstock slightly larger than the bottom of the bowl. Cut it out and glue it to the bottom of the bowl.
4. Stretch the sock over the opening of the bowl the lip of the bowl keeps the sock in place.
For the canning jar lid you will:
1. Drill two small holes in the edge of the jar ring for the bail to hang it with.
2. Cut an opening in the lid insert for the coin slot.
3. Attach the sock to the ring insert by the very edge then put it into the ring lid.
The wire bail helps keep the lid and sock in place.

I had Mark Mathis from the Great Smokey Mountain Flee Market, in Sevierville, TN. do the air brush painting on these socks for me. You can paint them yourself or give your kids blow paint and they can decorate their own. Or stamp or embroider etc.


Thursday, May 7, 2009

AWAJI-MUSBI LUCKY KNOT HAIR CLIPS

Awaji-Musubi or Lucky Knot

This isn’t an original idea by any means.
What I have done is used larger decorative cording
Instead of mizuhiki cords which makes for a much
larger knot design that fits well on hair clips and pins,
photo below. (actual size is about 4" wide & 2" high)


Wednesday, May 6, 2009

CANDY DISH/BANK


Here is a novel project for the home or office. This candy dish resembles a gum ball machine and has candy on top and a bank for coins on the bottom. If you keep a candy dish on your desk at work and everyone eats but never donates to refill, this might encourage them. You can also use it at home to teach children to save up to replace the candy when the dish is empty. The attached photos show the assembled item and the individual items used for the project.

Materials:
1 plant pot.(4" high, 2 1/2" bottom dia. and 4 1/4" top dia)
1 plant pot saucer.(6 1/4" dia. saucer)
1 candy dish (97cents at Walmart)
1 3" x 1/4" wood disc or jar cover same size.
1 3/4" diameter wooden ball
1 2" piece of a paint stir stick.
1 round head wood screw #6 x 3/4"
(All shown in photo below)


Preparation of the various pieces involves painting the saucer black, the plant pot red, and the assembled top red. The top is assemble by drilling a pilot hole in the 3" disc ( or jar top) and in the 3/4" ball, then attach the ball to the disc with a round head wood screw #6 x 3/4". The coin slot is a 2" strip of a paint stirring stick with a 1/8" by 1" slot cut in the center and painted silver. The coin slot in the plant pot is made by placing the paint stick piece on the pot ,as in first photo, then trace the slot onto the pot. Using a dremel with a small grinding stone attachment carefully cut the slot in the pot(make sure to wear saftey glasses). Super glue the the wooden slot section over the slot formed in the pot. After painting the saucer cut and glue a piece of felt to the area that will be covered by the plant pot, to cushion the droping of the coins through the slot. To assemble put a thin layer of museum gel on the open end of the plant pot and place onto the saucer as in top photo, this allows the bottom saucer to be removed to get the coins. Next attach the glass candy dish to the closed end of the plant pot with mighty putty or similar product. Place the assembled top into the candy dish opening. Your Candy Bank is ready for action!

Monday, May 4, 2009

MULTIPLE PAGE BOOK MARK


Here is a simple book mark that allows you to mark multiple pages in hard covered books with a binding. You will need plastic canvas and ribbons. Cut a small piece of plastic canvas just a little narrower than the binding on your book, I used 10 mesh for this one. Cut a strip of ribbon about 24" long. 1/16" or 1/8" wide. Fold the ribbon in half thread it through the holes of the canvas attach with a slip knot. Then repeat with a second piece of ribbon. Slide the square into the binding space place ribbons into book. You can use as many pieces of ribbon as the canvas spaces will allow for the book chosen. Note the plastic should be pushed level with the book edge. These were once used for hymnals

Friday, May 1, 2009

PATRIOTIC BUTTON PINS

These pins are quite easy to make.
Cut pieces of 1/8” ribbon approximately 7” long.
Fold the piece of ribbon in half.
Thread the ribbon through the holes of the button
from front to back.
Lay ribbon flat against the back of the button.
Glue pin to back of the button.
Voila you’re finished.

While these pins are patriotic what is nice about the style is you can fashion them to fit anything you want you are limited only by your imagination.
School colors, breast cancer pink, etc.
The pin backs can be bar pins, stick pins, your choice.


See photo below for needed materials


Here are 3 possible styles of pins you can make.


Monday, April 27, 2009

CRAFTING WITH DOMINOS

There are lots of things you can do with dominos, I made a few items as shown in the first picture in this post. I found some clip art that I liked and printed it on clear address labels. The labels where then stuck to the dominos and sprayed with a coat of polyurethane. I made some into necklaces, key chains, lapel pins, and magnets. For the necklaces simply drill a 3/32" hole from side to side about 1/4" from the end of the domino, then cut a piece of decorative cord to string through the hole and knot ends together(could be put on a chain as well). The keychain is made by taking the domino drill a 1/16" hole in the center of the top end of it. Then screw a small eyelet into the hole (eyelets can be purchased at hardware in chrome or brass) and attach keyring. The pin is made by simply glueing a jewelery pin to one side of the domino. The magnet is made simply by glueing a magnetic strip to one side of the domino. Dominos can also be decorated by stamping designs onto them. I am sure you will come up with many other ways to use these handy items. Email me and let me know some of your ideas, I would love to hear them.


This domino clock is an item my husband and I made for my craft room. When I started this post I searched the net for domino clocks and found a site called dominoclocks.com that sells clocks at $25.00 to $35.00 each. You can made one yourself for alot less. All you need is a clock kit from Hobby Lobby or some other craft store, a round, square, or what ever shape piece of material, and 12 dominos from 1 to 12. We used a piece of Purple Heart wood to make our clock. You will need to drill a hole in the center of your clock base to match the shaft of the clock works. Finish your base with paint or polyurethane glue the dominos in the proper order at spaces of 30 degrees around the clock face. Insert the shaft of the clock works through the hole in the base from the back of the clock. Screw the supplied nut onto the clock works shaft and tighten down, then attach the hands. On the back of the clock we glued a frame around the works and attached a wall hanging bracket because of the weight of the clock (purple heart is a hard heavy wood). Some clock kits have a wall hanging bracket attached to the clock works. Now put the proper size battery in your new clock and find a spot to hang it.


Friday, April 24, 2009

MINI PHOTO ALBUM TIN

PHOTO TIN
I am not big on photos but family members are. I am big on recycling. Small Altoids tins make for nice photo boxes for grandma to carry in her purse or MOM. If you don’t have Altoids there are round decorative tins used for pills you can buy at any drug store .You will need to remove the divided section from one of these tins.

SUPPLIES NEEDED: Scissors, felt, double stick tape, Cardstock, ribbon, and a tin of your choice.


1. Cut a piece of ribbon about 20” long.
2. Cut two pieces of felt to cover the bottom and top insides of the tin. ( note the ribbon will be glued under the felt for the bottom)
3. Measure and cut an equal number of card stock pieces the shape of the inside bottom of the tin you will be using.
4. Glue half the pieces to one side of the ribbon spaced in a manner that will allow you to fold them accordion style. Turn it over and glue and additional piece of cardstock overtop of the existing piece .You will now have a two sided area where you will be able to glue photos to.
5. Pick photos cut and paste them to the cardstock.